
How to Do Paint Correction: The Complete Guide to Perfection

If your car’s finish has lost its luster or accumulated visible scratches, paint correction might be the fix you need. It’s a process designed to remove imperfections like swirls, minor scratches, or oxidation, restoring your vehicle’s sleek, polished look. Whether you’re a DIY enthusiast or new to car detailing, paint correction is an achievable way to protect and enhance your car’s appearance. With the right tools and techniques, you can tackle these imperfections yourself while learning valuable skills in car detailing paint correction.
Understanding Paint Correction
Paint correction is a transformative step in car detailing that can completely change how your vehicle looks and feels. If you’re wondering how to do paint correction, it’s important to first understand what it is, why it matters, and what types of imperfections it can address. Let’s break it down.
What is Paint Correction?
Simply put, paint correction is the process of removing surface-level defects from your car’s paintwork. This could include scratches, swirl marks, water spots, or oxidation. Using specialized tools and polishing compounds, the goal is to carefully eliminate imperfections in the clear coat.
Think of it like buffing out the scratches on your favorite pair of sunglasses. By smoothing out these blemishes, you allow the surface to reflect light more evenly, restoring that showroom-quality shine. This process goes beyond just covering up flaws—it permanently removes them for a smooth, polished finish.
Benefits of Paint Correction
Why bother with paint correction? The benefits go far beyond just making your car look good. Here’s how it helps:
- Enhanced Appearance: By removing defects like swirls or scratches, your car’s paintwork will regain its glossy, reflective finish. It’s an instant upgrade to its overall look.
- Protects the Clear Coat: Regular correction helps maintain the clear coat, which acts as the shield for your car’s paint. A healthy clear coat means less risk of deeper paint damage down the line.
- Preserves Value: A well-maintained finish helps maintain resale value. Buyers notice pristine paintwork, and it signals that the vehicle has been taken care of.
- Preps for Further Protection: Once the paint is corrected, it’s the perfect time to add a protective layer (like ceramic coating or wax) to keep it looking fresh for longer.
Think of paint correction as preventive care—it fixes what’s wrong today and sets your car up for fewer problems tomorrow.
Common Paint Issues Addressed
Paint correction targets a variety of imperfections that can dull or damage your car’s finish. Here are the most common issues it resolves:
- Swirl Marks: Those spider web-like scratches caused by improper washing or drying techniques.
- Oxidation: A chalky or dull appearance due to prolonged exposure to sunlight and air.
- Water Spots: Hard water stains that leave behind unsightly marks on the paint’s surface.
- Light Scratches and Abrasions: From shopping carts or keys brushing against the car, light scratches can be effectively removed.
- Etching from Bird Droppings/Bug Splatter: Acidic substances can eat into the paint over time, creating tough blemishes.
Each of these imperfections impacts how light reflects off your vehicle, which is why correcting them can make such a big difference. Addressing these problems is a crucial step in learning car detailing paint correction.
When you tackle paint correction, you’re not just cleaning or polishing—you’re restoring your car’s soul. Properly done, it can make a well-used car look almost brand new again.
Preparation Steps for Paint Correction
Before diving into car detailing paint correction, it’s essential to prep your vehicle correctly. A smooth, clean surface ensures optimal results and reduces the risk of further damage to your paintwork. Think of this step as laying the foundation before building a house—skipping it can lead to a shaky outcome, no matter how skilled you are in the actual paint correction process. Below, we’ll walk you through the critical preparation steps.
Thorough Wash and Decontamination
The first step in preparing your car for paint correction is a deep and thorough wash. Your goal here is to remove all dirt, grime, and embedded contaminants that can scratch the car during the correction process.
Here’s how to do it:
- Choose a pH-balanced car soap: A high-quality car wash soap helps lift dirt without harming the clear coat. Look for products labeled specifically for detailing.
- Use the two-bucket method: One bucket is filled with soapy water while the other holds clean water for rinsing your wash mitt. This minimizes the chances of reapplying dirt to the surface.
- Foam cannon (optional): If you have access to one, pre-spraying the car with a foam cannon helps loosen up dirt for safer scrubbing.
Once the surface is clean, tackle embedded contaminants:
- Apply an iron remover: Iron fallout from the road can embed into the paint, appearing as tiny rust spots. Spray the remover evenly across the car’s surface and watch for color changes as it dissolves contaminants.
- Clay bar treatment: Use a clay bar or clay mitt with a lubricant to pick up stubborn debris embedded in the surface. Glide the clay gently over sections of the car, starting with horizontal panels (hood, roof, and trunk) before moving to vertical ones.
By the end of this process, you’re left with a squeaky-clean surface that’s smooth to the touch and ready for inspection.
Inspecting Paint Condition
Now that the surface is clean, it’s time to evaluate the level of damage. The better you know your car’s condition, the more effectively you can plan your paint correction steps.
Here’s what to do:
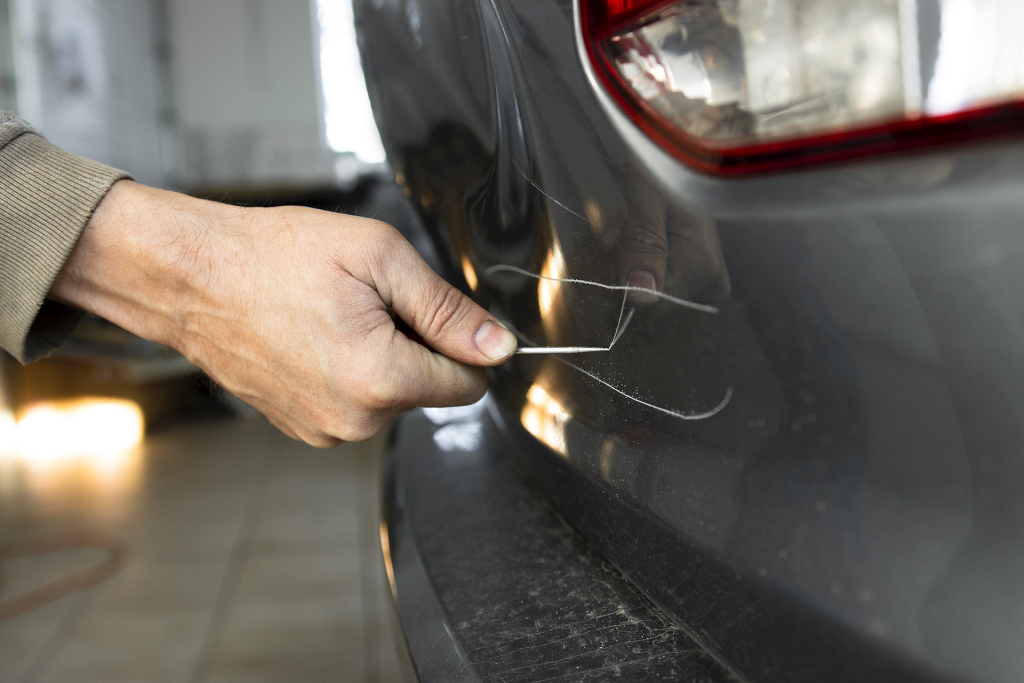
- Work in good lighting: Move your car into a well-lit area or use a handheld detailing light. Lighting is critical for spotting fine scratches, swirl marks, and other imperfections.
- Look for common issues: Swirl marks, bird dropping etchings, water spots, or even oxidation all affect your paint differently. These flaws will dictate the level of correction needed.
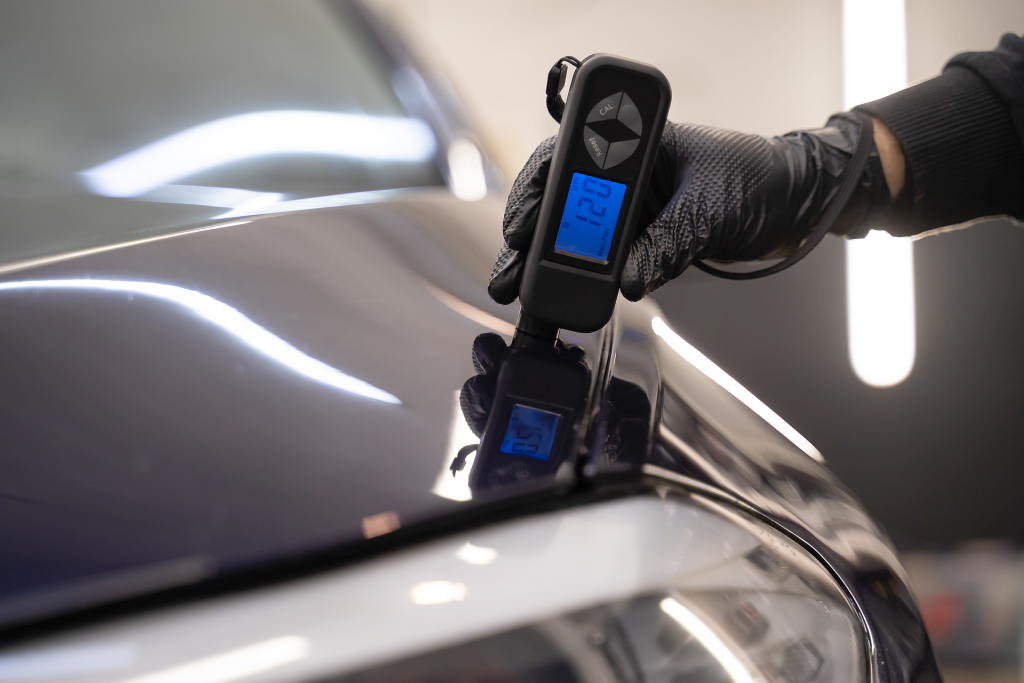
- Use a paint thickness gauge: This tool is essential for understanding how much clear coat you have left. Many imperfections are in the clear coat, but if too much has been removed before (from previous corrections or weathering), polishing aggressively could burn through to the base coat.
Paying attention during this step not only ensures better results but also prevents costly mistakes. It’s always better to proceed with caution than to risk over-correction.
Taping Off Trim and Sensitive Areas
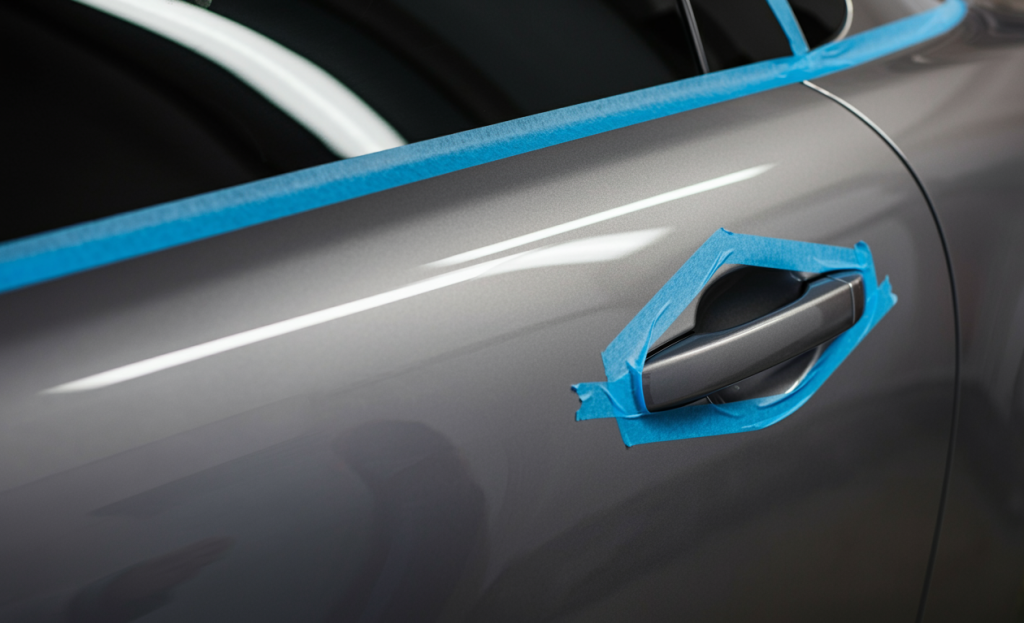
Before you begin polishing, you need to protect the non-painted parts of your car. Machine polishers and compounds can stain or ruin trim, badges, rubber seals, and other sensitive areas.
Follow these simple steps:
- Grab high-quality masking tape: Look for tape designed specifically for automotive use, as it removes cleanly without leaving residue behind.
- Cover sensitive areas: These include:
- Plastic or rubber trims (around windows, mirrors, etc.)
- Headlights, taillights, and badges
- Emblems and door handles
- Edges near convertible roofs (if applicable)
- Test your tape adherence: Ensure the tape sticks firmly but doesn’t leave residue. If it’s not holding, wipe the area with some isopropyl alcohol before reapplying.
Taping is like creating guardrails; it prevents accidents and ensures you can polish freely without concern. Spending time on this task can save you from tedious clean-up or costly repairs later.
By the time these prep steps are completed, your vehicle will be ready for the actual paint correction. With a clean surface, clear understanding of the challenges ahead, and sensitive areas protected, you’ve set yourself up for success in achieving that flawless mirror-like finish.
Step-by-Step Paint Correction Process
Once you’ve prepared your vehicle for correction, it’s time to get into the main event: paint correction. This process involves several critical steps to remove imperfections and restore that flawless finish. Let’s break it down into manageable stages to ensure you’re set up for success.
Choosing the Right Tools and Products
Paint correction is only as effective as the tools and products you use. Picking the right combination can make all the difference in achieving professional results.
- Machine Polishers: These come in two main types:
- Dual-Action (DA) Polishers: Ideal for beginners, they’re easier to control and less likely to burn through your paint. Perfect for light to moderate corrections.
- Rotary Polishers: More powerful but require a skilled hand. They’re best for heavy imperfections but can easily damage paint if used incorrectly.
- Pads: The type of pad you choose depends on the level of correction required:
- Cutting Pads: Made for aggressive material removal when tackling deeper imperfections.
- Polishing Pads: Used to refine the surface after compounding.
- Finishing Pads: Designed for producing the smoothest, glossiest finish in the final stages.
- Compounds and Polishes:
- Use a cutting compound for deeper scratches or oxidation.
- Switch to a polishing compound for refining and achieving a high-gloss shine.
Test products in a small, inconspicuous area before working on larger sections. It’s your safety net to ensure compatibility with your car’s paint.
Compounding: Removing Deep Imperfections
This stage targets the bigger flaws like deep scratches, oxidation, or noticeable swirl marks. Here’s how to handle it:
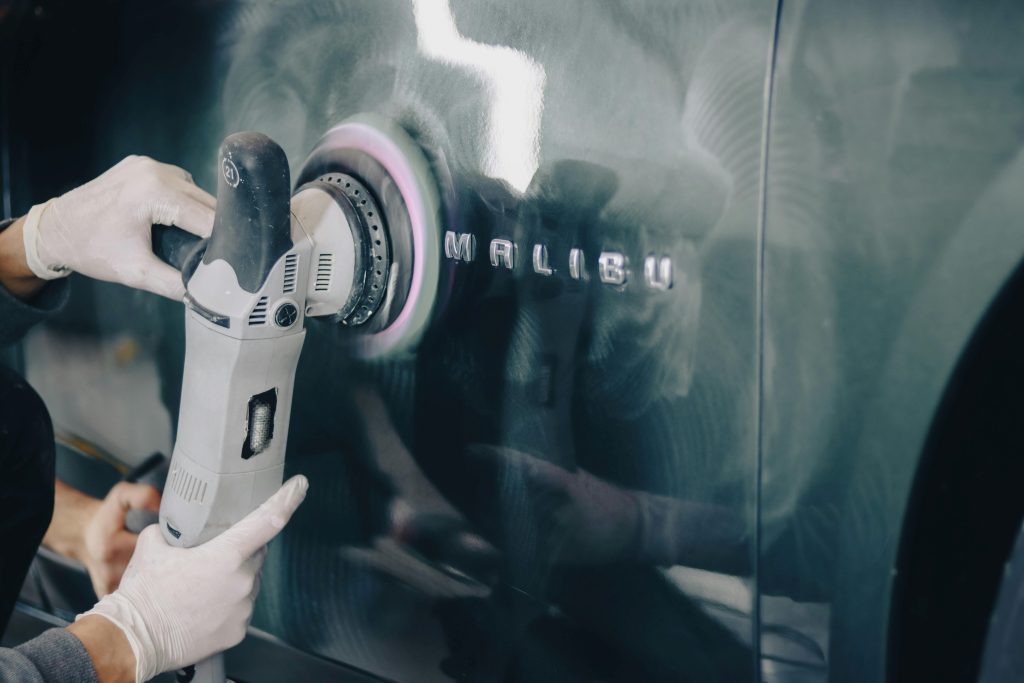
- Apply the compound: Use a cutting pad with your machine polisher and apply a small amount of compound. Start with a dime-sized drop—less is more here.
- Work in sections: Break your car into 2’x2′ sections. Overloading a large area can make it harder to control results.
- Set the polisher speed: On a DA polisher, set to medium speed. For a rotary polisher, work more cautiously at a lower RPM to avoid heat build-up.
- Polish in overlapping passes: Move the polisher in horizontal and vertical patterns. Overlap each pass slightly to ensure even coverage.
Inspect your results under good lighting after completing each section. If deeper scratches remain, you might need a second pass. Remember, patience is key—you’re aiming for perfection, not speed.
Polishing: Refining the Finish
Once compounding is complete, the surface may look slightly hazy. Polishing smooths out the fine imperfections left by compounding while increasing clarity and gloss.
- Switch to a polishing pad: Swap out the more abrasive cutting pad for a softer polishing one.
- Apply polish sparingly: Use just enough product to cover the pad lightly.
- Focus on consistency: Similar to compounding, move the polisher in a crosshatch pattern for uniform results.
- Inspect frequently: After polishing each section, check for a mirror-like reflection. If needed, repeat the process to refine further.
This step transforms the paint, bringing out depth and shine while eliminating mild surface imperfections.
Cleaning Between Steps
Neglecting to clean the surface between steps can undo all your hard work. Each stage leaves behind polishing dust, oils, and tiny debris that need clearing.
- Use an isopropyl alcohol (IPA) solution: A diluted IPA mix is perfect for cutting through residues. Spray it lightly onto the surface and wipe it clean with a fresh microfiber towel.
- Switch to a clean towel frequently: Avoid reintroducing contaminants by rotating to a new towel as soon as the current one gets dirty.
By cleaning between stages, you’ll avoid cross-contamination and ensure that each product works as intended. It’s a small step with big rewards.
Final Surface Protection

Cropped close up image of male hand in protective black glove, holding white sponge with solid carnauba wax, and polishing hood of luxury blue car at professional detailing workshop. Car detailing.
With your paint now corrected to perfection, it’s time to lock in the results. Protection is non-negotiable—it shields the car from future damage and keeps that pristine look intact.
- Options for Protection:
- Wax: Offers immediate shine and protection but typically lasts only a few months.
- Ceramic Coating: Provides long-term durability, often years of protection, while enhancing gloss and resisting dirt, water, and UV damage.
- Sealant: A middle-ground option, offering durability somewhere between wax and ceramic coatings.
- Wax: Offers immediate shine and protection but typically lasts only a few months.
- Application Tips:
- Use an applicator pad or microfiber towel to apply the product evenly.
- Follow the specific product instructions for curing times.
- Buff with a clean microfiber towel to a high shine as the final touch.
- Use an applicator pad or microfiber towel to apply the product evenly.
Think of protection as the armor that shields your hard work. Without it, your flawless finish is vulnerable to the very imperfections you just worked to remove.
By carefully following these steps and paying attention to detail, you can master the art of car detailing paint correction. Each stage builds on the last, transforming your car’s paint from flawed to flawless.
DIY Paint Correction: What to Consider
DIY paint correction can be an exciting project if you’re hands-on and enjoy taking care of your car. However, this route demands more than just enthusiasm—it requires preparation, patience, and the right tools. Before you dive in, here’s what you need to think about.
- Skill Level: If you’re new to car detailing, there’s a learning curve. Using tools like dual-action polishers might feel intimidating at first, but they’re beginner-friendly with plenty of practice. Knowing how much material to remove and when to stop is crucial to avoid damaging the clear coat.
- Time Commitment: Paint correction isn’t a quick task. From cleaning and decontaminating your car to polishing and protecting it, you’re looking at several hours, if not a full weekend. Are you ready to dedicate that much time?
- Access to Tools and Products: You’ll need a decent investment in equipment, including polishers, pads, compounds, and protective coatings. While you can rent or buy these, higher-quality products often mean better results. Skimping on tools might lead to uneven finishes or limited durability.
- Challenges and Risks:
- You might not achieve a perfectly even polish, especially on your first attempt.
- Over-polishing can burn through the clear coat, leading to costly repairs.
- Working without proper lighting or preparation can cause you to miss imperfections.
DIY paint correction is best suited for those who love learning new skills and are comfortable experimenting on their vehicle. Just remember, mistakes can happen, so starting on a less visible area can help build confidence.
Professional Services: When to Choose Experts
Professional paint correction services exist for a reason—they deliver consistency and expertise. Whether you’re dealing with significant damage or want the best possible finish, professional detailers can provide results that are often hard to match at home. Here’s why you might opt for the experts.
- Perfect for Complex or Severe Damage: If your car has deep scratches, noticeable swirl marks, or oxidation, professionals are trained to handle these challenges. They use high-end tools like rotary polishers, which require experience to operate without causing further damage.
- Guaranteed Results: Pros understand paint thickness, machine settings, and which products work best for different types of paint. This knowledge ensures a flawless finish, often with additional services like wet sanding or multi-step corrections for showroom-quality results.
- Time Efficiency: While a DIY project could take you 8–10 hours or more, professionals can complete the job significantly faster. They have streamlined processes and access to advanced equipment, saving you time and hassle.
- Long-Term Durability: Paint correction from a professional often includes premium protective topcoats like ceramic coatings or paint sealants. These not only enhance shine but also provide long-term resistance to dirt, UV rays, and minor abrasions.
Hiring a professional is ideal if you want a reliable and polished result without the risk of damaging your vehicle. It’s also the better choice if you lack the time, patience, or equipment required for DIY projects.
Ultimately, the decision between DIY and professional paint correction comes down to your priorities. If you value learning and cost savings, DIY can be an enjoyable challenge. However, for top-tier results with minimal stress, putting your car in the hands of an expert is often worth the investment.
Maintaining Corrected Paint
Congratulations, your car’s paint is now shining like new after the correction process! But the job isn’t over yet. To protect your hard work and maintain that stunning finish, you’ll need to follow proper care practices. Let’s go over the key steps to keeping your paint correction looking flawless for months—or even years.
Cleaning Tips Post-Correction
Your cleaning routine has a huge impact on the longevity of paint correction. A single improper wash can reintroduce swirl marks or scratches, undoing all your effort. Here are the safest and most effective methods for cleaning your car post-correction:
- Use a Two-Bucket Method: Designate one bucket for soapy water and another for rinsing your mitt. This minimizes the chance of reintroducing dirt and scratching the paint.
- Go for a pH-Neutral Car Shampoo: A mild, pH-balanced soap is crucial for maintaining the integrity of the protective coatings applied after correction. Skip harsh detergents or dish soaps—they strip away finishes.
- Invest in Quality Wash Mitts: Microfiber wash mitts are your best friend. Unlike sponges, they trap dirt safely and reduce the risk of causing swirl marks.
- Rinse with a Pressure Washer: A pre-wash rinse helps loosen dirt and debris before you touch the surface with a mitt. It’s an extra layer of protection for your paint.
- Dry with Microfiber Towels: After washing, pat or blot the surface dry with an ultra-soft microfiber towel to prevent water spots. Avoid aggressive rubbing.
Additional Tips:
- Never wash your car under direct sunlight—water will dry too quickly, leaving streaks or spots.
- Consider a foam cannon for even contactless pre-cleaning, which reduces the risk of physical damage.
Consistently gentle cleaning is your first line of defense against reintroducing imperfections to your paint.
Periodic Protection Renewal
While washing helps keep your car looking great, maintaining the protective layers applied after paint correction is just as important. Over time, waxes, sealants, or ceramic coatings wear away, leaving your paint vulnerable. So, how often should you renew them?
- Wax: Traditional waxes last about 2–3 months. If you notice water no longer beading on the surface or a lack of shine, it’s a sign it’s time to reapply. Waxing takes minimal effort and keeps your paint looking sharp.
- Sealants: A synthetic sealant offers more durability, usually lasting 4–6 months. They’re a great choice if you want robust protection without frequent reapplication.
- Ceramic Coatings: These are the marathon runners of paint protection, lasting 1–5 years depending on the quality and application. However, they still benefit from periodic enhancements like ceramic-friendly toppers to maintain hydrophobic properties and gloss.
How to Reapply Protection:
- Clean and decontaminate your car before applying a new protective layer. Use an iron remover or a light clay bar session if needed.
- Follow the specific product instructions. Some products may require curing times or application in shaded environments.
- Protect areas like headlights and trim with tape if you’re working with more advanced coatings like ceramics.
Renewing protection isn’t just about aesthetics; it also shields the paint from UV rays, bird droppings, harsh weather, and contaminants. Treat your maintenance routine as car armor—it’s worth the effort to preserve the flawless finish you’ve achieved.
F.A.Q: Addressing Common Paint Correction Questions
When you’re getting ready to tackle paint correction, it’s natural to have a few questions. This process involves precision and care, so knowing the answers to common concerns can help you feel more confident. Here are some frequently asked questions and clear explanations to guide you through your car detailing paint correction journey.
What Tools Are Essential for Paint Correction?
To get the best results, you’ll need the right tools. Paint correction requires specific equipment to ensure you can safely and effectively remove imperfections without causing further issues. Here’s what you should have:
- Dual-Action Polisher: A beginner-friendly machine tool that’s less likely to cause damage. It’s perfect for tackling swirl marks, scratches, and other surface defects.
- Polishing Pads: These come in different types:
- Cutting Pads for heavy defect removal.
- Polishing Pads for refining the surface.
- Finishing Pads to add a deep gloss and smoothness.
- Polishing Compounds: These are essential for correcting defects. Use a heavier compound for deeper scratches and a lighter one for final polishing.
- Paint Thickness Gauge: A critical tool that measures how much clear coat is left. This prevents you from removing too much material and accidentally exposing the base coat.
- Microfiber Towels: These are a must for cleaning as you go to avoid scratching the surface.
- Detailing Light: Proper lighting helps you see imperfections clearly so you can track your progress.
These tools form your foundation for professional-quality paint correction at home. Investing in these items ensures that you work effectively and safely.
Can Paint Correction Damage My Car?
Yes, paint correction can cause damage if done improperly, but the risk is entirely manageable with the right approach. The most common mistakes occur when over-polishing or using improper techniques, which can lead to “burn-through,” where the clear coat is completely worn away.
Here’s how to avoid problems:
- Always Use a Paint Thickness Gauge: Know how much clear coat your vehicle has before starting. Thinner areas require a much more delicate touch.
- Start with the Least Aggressive Method: Use a softer pad and lighter compound before progressing to stronger products. This minimizes the risk of overworking the paint.
- Control Your Machine Polisher: Keep the polisher moving at steady, overlapping passes. Never stay in one spot too long, as heat buildup can damage the paint.
- Practice on a Spare Surface: Test your technique on an old or less visible panel to gain confidence before working on the main body.
When done carefully, paint correction is safe and highly effective, leaving your car looking like new.
How Often Should Paint Correction Be Done?
There’s no one-size-fits-all answer to how often you should do paint correction—it depends on your car’s condition, driving habits, and exposure to environmental elements. However, here are general guidelines:
- Lightly Used Cars: If your car is mostly garaged or driven occasionally, paint correction may only be needed every 2–3 years. Light touch-ups can maintain a flawless look in between.
- Daily Drivers: Vehicles used daily and exposed to road debris, weather, or improper washing techniques may benefit from correction every 12–18 months.
- Environmental Factors: Cars exposed to salty roads, harsh sun, or acid rain may need more frequent corrections due to faster paint degradation.
Over-correcting is unnecessary and can reduce the lifespan of your clear coat. Stick to a proper maintenance routine, like regular washing with gentle methods and applying protective coatings, to lengthen the time between corrections.
Is Paint Correction Suitable for All Cars?
While paint correction is highly effective for most vehicles, it’s not always suitable for every situation. Certain factors can limit its usability, such as the car’s paint condition or age.
- Older Vehicles: If your car has been polished multiple times before or has very thin clear coat remaining, paint correction is risky. Use a paint thickness gauge to determine remaining material.
- Budget Paint Jobs: Some repainted surfaces might lack a durable clear coat, making them prone to damage during correction.
- Deep Defects: Scratches or imperfections that extend into the basecoat or primer can’t be fixed with paint correction alone. These require touch-up paint or professional repair.
For newer vehicles or those with minor imperfections, paint correction works wonders. For older or compromised cars, you’ll want to tread carefully and consider alternative solutions.
What’s the Best Way to Learn Paint Correction?
Want to learn how to do paint correction and achieve professional results on your own? Start with a combination of research, hands-on practice, and reliable resources designed for beginners.
Here’s how you can get started:
- Watch Tutorials and Guides:
- YouTube is packed with tutorials that walk you through the process. Look for creators with a professional background or strong reviews.
- Channels like Ammo NYC or The Detail Geek are popular within the car detailing community.
- Enroll in Online Courses:
- Platforms like DetailWise, Car Detailing Secrets, or even paid instructional DVD sets provide step-by-step lessons.
- Platforms like DetailWise, Car Detailing Secrets, or even paid instructional DVD sets provide step-by-step lessons.
- Practice on Test Panels:
- Purchase cheap test panels from a scrap yard or online to practice your technique without risking your car.
- Purchase cheap test panels from a scrap yard or online to practice your technique without risking your car.
- Join Online Communities:
- Forums like Autogeek or Reddit’s AutoDetailing community are great for getting advice and sharing your progress with other enthusiasts.
- Forums like Autogeek or Reddit’s AutoDetailing community are great for getting advice and sharing your progress with other enthusiasts.
- Start Small:
- Focus on a single panel (like the hood or door) before moving to the entire car.
With time and practice, you’ll get the hang of using tools, managing compounds, and producing a mirror-like finish. Patience is key, and so is learning from any small mistakes along the way.
By answering these FAQs, you’re more prepared to tackle car detailing paint correction with confidence. This knowledge empowers you to make the right choices for your car and skill level, setting you up for success.
Conclusion
Paint correction is more than just a car care routine—it’s an investment in your vehicle’s appearance and value. By removing imperfections, you’re not only restoring its original shine but also extending the life of the paintwork.
Start small. Experimenting on a single panel or less noticeable area will build your confidence without overwhelming you. With time, practice, and the right tools, you’ll see just how rewarding car detailing paint correction can be.
Maintaining a pristine car finish takes effort, but the results are undeniable. Whether you choose DIY projects or professional services, mastering or understanding paint correction ensures your car looks its best while staying protected for the long haul. So, get started and give your vehicle the flawless finish it deserves.